Title: Family Portrait Contours Unit: Africe
Grade Level: 4th-6th Grade Medium: Drawing
Suggested Time: One Class Period
Instructional Objectives:
Students will identify and use contour lines. Students will use pencil of maker to draw a continuous line that describes an object from observation. Students will create an original artwork that communicates ideas about family.
Elements of Art:
Line, Space, Form
Principles of Design:
Balance, Unity
Materials and Equipment:
9x12 Construction Paper, White Computer Paper, Scissors, Glue, Pencils, Water-Based Colored Markers, Erasers, and 4 Figures
General Vocabulary:
Observational Drawing, Contour, Blind Contour, Composition, Portrait, Family, Awkward
Art Production:
1) As students walk in and become settled, ask if they have ever taken their own family portraits. Ask if they made funny faces or poses that may have been "awkward."
2) Tell students they will be doing contour and blind contour drawings, explain and show examples what each means.
3) Look at awkward family portraits using the website, http://awkwardfamilyphotos.com/category/photos/the-family-portrait/, and discuss differences in photos. Also discuss how families can look different by parents being of opposite sex, same sex, older, younger, etc.
4) Demonstrate contour drawing and then have the students do the same.
5) Demonstrate blind contour drawing and then have the students do the same.
6) Before continuing, check with the students for their understanding of the project. Ask questions about the new vocab they learned or ask about the steps of what the next part entails.
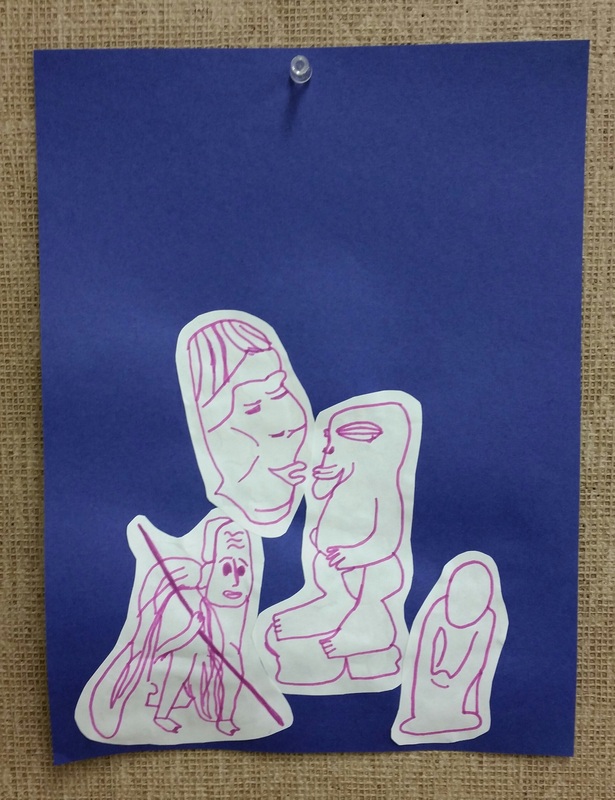
7) Have students fold white computer paper into 1/4's and then in an unified manner, have them go to each of the four tables and draw the displayed figure in each of the squares. There will be a two minute time limit for each.
8) Once all four figures are drawn, have students return to their seats, going over the pencil lines on paper with colored markers provided.
9) Have students cut figures, leaving a 1/4" border around pictures.
10) Have students arrange figures on construction paper until they find positions they like, then have them glue the figures down.
11) After students clean up supplies when project is finished, review terms learned and ask what they project meant to the students.
Grade Level: 4th-6th Grade Medium: Drawing
Suggested Time: One Class Period
Instructional Objectives:
Students will identify and use contour lines. Students will use pencil of maker to draw a continuous line that describes an object from observation. Students will create an original artwork that communicates ideas about family.
Elements of Art:
Line, Space, Form
Principles of Design:
Balance, Unity
Materials and Equipment:
9x12 Construction Paper, White Computer Paper, Scissors, Glue, Pencils, Water-Based Colored Markers, Erasers, and 4 Figures
General Vocabulary:
Observational Drawing, Contour, Blind Contour, Composition, Portrait, Family, Awkward
Art Production:
1) As students walk in and become settled, ask if they have ever taken their own family portraits. Ask if they made funny faces or poses that may have been "awkward."
2) Tell students they will be doing contour and blind contour drawings, explain and show examples what each means.
3) Look at awkward family portraits using the website, http://awkwardfamilyphotos.com/category/photos/the-family-portrait/, and discuss differences in photos. Also discuss how families can look different by parents being of opposite sex, same sex, older, younger, etc.
4) Demonstrate contour drawing and then have the students do the same.
5) Demonstrate blind contour drawing and then have the students do the same.
6) Before continuing, check with the students for their understanding of the project. Ask questions about the new vocab they learned or ask about the steps of what the next part entails.
7) Have students fold white computer paper into 1/4's and then in an unified manner, have them go to each of the four tables and draw the displayed figure in each of the squares. There will be a two minute time limit for each.
8) Once all four figures are drawn, have students return to their seats, going over the pencil lines on paper with colored markers provided.
9) Have students cut figures, leaving a 1/4" border around pictures.
10) Have students arrange figures on construction paper until they find positions they like, then have them glue the figures down.
11) After students clean up supplies when project is finished, review terms learned and ask what they project meant to the students.
